home |  electronics |  toolbox |  science club |  tuxtalk |  photos |  e-cards |  online-shop

http://tuxgraphics.org/electronics
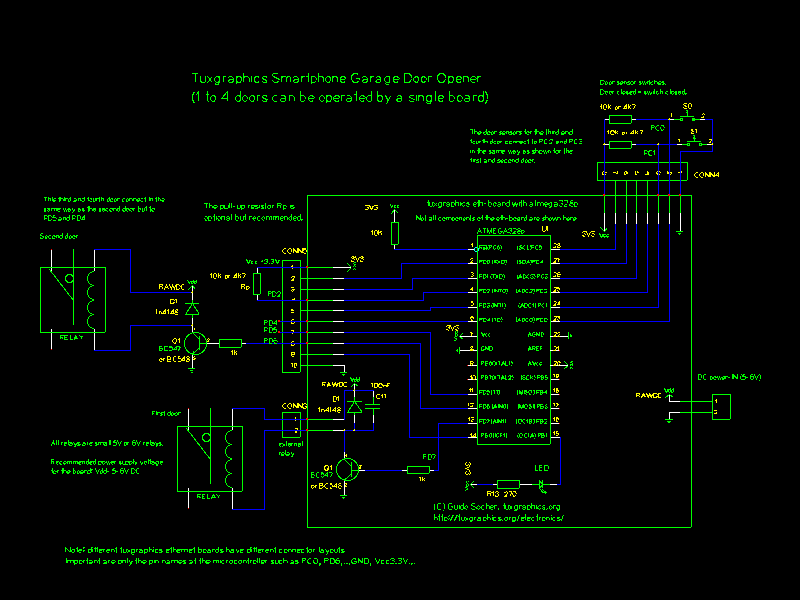


Content:
By Guido Socher


Smartphone garage door opener

[Illustration]

Abstract:

Nobody leave these days the house without keys and mobile phone. Wouldn't it be nice if you could use your mobile phone to open or close the garage door? No extra garage door opener device. Just use you mobile phone!

The tuxgraphics garage door opener is not limited to just one type of smartphone. It does not require the installation of an app. It works with any phone that has a web browser built-in. This garage door opener can be used from an iPhone, from an Android phone or any data capable phone. It does not even have to be a smartphone.

The title image with the fighter jet in the garage is courtesy of http://style-your-garage.com. The company makes large waterproof posters to decorate the garage door.

_________________ _________________ _________________


What it looks like

This garage door opener can control up to 4 doors. The system is based on the tuxgraphics ethernet board. On one side you connect it in parallel to the push buttons which are inside your garage to open/close the doors and on the other side you connect it to your DSL router to be accessible over the internet. Optionally you can attach a little switch which detects the state of the door. This way you can see when the doors where opened or closed and what the doors current state is.

Overview
Overview drawing. The blue connections are added. This works with any motorized garage door opener hardware as long as that hardware supports wall mounted wired push buttons inside the garage.

The door contact is optional but very useful. This allows you to see on the smartphone what the current state of the door is. The system keeps a list with the history of the last 50 events and one can see in this history at what time the door was opened/closed no matter if it was via the phone, wall mounted push button or wireless remote control.

The ethernet board runs a web server. In other words you have a web interface to your garage door and you can operate it from your phone or any of your computers:

smartphone basic phone firefox webbrowser

Controlling the garage doors from different devices
 

Security

When you access the web page of your garage door opener then you can not do anything without password.

This garage door opener has many different security features to make access both secure and convenient. The system has the following 3 passwords:


main page
The main page.

On the main page you see the door states. The symbol |.| means door open and the symbol |=| means door closed. The above system is configured for two doors. You can have up to 4 doors.

Below the door states you select which of the doors to open/close and then you enter the passcode to activate the door.

When you come by car and you open/close your garage door every day then it become very quickly annoying to enter a code every time. The system offers therefore the possibility of passcode free access. Up to 3 devices (mobile phones or computers with web browsers) can be configured that way. It works by storing a fingerprint of the device and setting a cookie in the devices web browser. The cookie is good for 600 days after that you have to re-enable it. You can clear all passcode free access at any time. If you lost e.g your phone then you just clear passcode free access and the one who found the phone can not do anything.

enable passcode free access for a specific device only passcode free access is enabled for this device

Enabling passcode free access for a specific device and the door control page when passcode free access is on for that specific device (PC in this case).
 

History log

The system keeps a history for each and every event with time and date. The time is derived from the system time in your web browser. This has the advantage that you do not need to configure the clock.

Here is a screenshot of a history log. The log stores the last 50 events.


history
The history log.

"cfree" means code free access. cfree1 is the device number 1 that was configured for passcode free access. If somebody opened the door by manually typing the password then you would see "code" and a number. If you see a door open/close line with no "cfree" or "code" then the door was opened by some other other means (e.g push button on the wall).  

Run time settings

In the "[set]" menu, accessible from the main page, you can change passwords. All passwords are store in eeprom. In other words they will not be lost even if there is a temporary power outage.

Here is a screenshot of a the password settings page.


settings
password settings page

The system can es well be reset to compile time defaults in the event that you forgot the passwords (especially the master password). To do this you will need local access to the ethernet board and connect pin PD2 with GND. After that power cycle the board and remove the connection between PD2 and GND. The master password is now back to compile time default (it should be the string "secret" unless you changed it). You can now go to the run settings page and set a new password.
 

What do I need?

You have seen how to use the garage door opener but what do you need to build it?

From a hardware point of view you need:

From a service point of view you need:  

The ethernet board

The tuxgraphics ethernet board acts as a web server towards the user and towards your garage door electronics it emulates a push button. This is done by closing a relay contact for a second and opening the relay again. The board reads as well continuously the state of the door sensor switches to know at what moment the door opened/closed.

The ethernet board is a standard tuxgraphics board. The following circuit diagram shows just the extra parts you need and how to connect them.

circuit diagram: relay and optional push button
Circuit diagram with external connections: relay and optional connection to switch to sense the state of the door. The relay contacts are then to be connected in parallel to the wall mounted push buttons inside your garage. The best way to connect this is at the motor unit.
Click on the image for a PDF version.


I mounted the ethernet board on a small piece of wood together with some screw-on terminations for the cables. A simple and good solution for use in the garage. The system here is made for two doors and the relays fit onto the dot-matrix field of the board.

the ethernet board

Ethernet board and some screw-on terminations for the cables mounted on a piece of wood.
 

The door contact

To get the state of the garage door in a reliable way is more complicated than it seems at first. The reason is that the doors are quite rough mechanical parts and there are tolerances of up to 1cm (0.4inch) involved. That is: the door will not always slide or flip back into the exact same position and if it comes too close to a small door contact then it will just smash it.

The best two options are:

reed switch
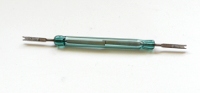
A reed contact and a magnet. This works well for doors that have mechanics with tolerances of up to 0.5cm, 0.2inch. I recommend to use strong magnets to allow for a good air gap between reed contact and magnet (e.g rare earth magnets).

snap action switch
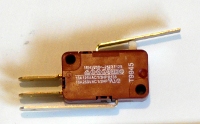
A snap action limit switch and a bicycle spoke or some other elastic wire. This is the best option as it can compensate for large mechanical tolerances.


bicycle spoke and snap action switch

bicycle spoke and snap action switch


The bicycle spoke is a strong enough wire to activate the snap action switch and it is a bit elastic. It can compensate the tolerances of the doors very well.


snap action switch

The snap action switch mounted on a piece of wood with which it can be attached besides the garage door.


The door shown in the below picture is a sliding garage door. It slides up and down. The bicycle spoke is bent such that it can activate the switch and then screwed to the door. A similar design can be used with garage doors that tilt back. The switch has just to be mounted in a different position.

the final door contact installation

The door contact installed at the garage door.
 

Wifi to the garage

I did not have ethernet LAN cables in the garage. Therefore I used a WiFi client AP to connect back to my WiFi DSL router. How this works is described in AVR WiFi.

When you go for this option then make sure your WiFi router provides a good signal strength to the garage otherwise this may not work reliably. You can use a WiFi range extender if the signal in the garage is weak. The WiFi range extender has to be placed somewhere in the middle between your WiFi router and the garage.

final installation

The final installation in the garage. I made a little shelf below the garage ceiling. The tuxgraphics ethernet board is under the blue ethernet cable and on the left is the WiFi Client AP.
 

2G, 3G, WiFi

The best option is probably to make the smartphone garage door opener available on the internet. For this you need to configure port forwarding in your DSL router and you need to either get a static IP address from your internet service provider or use dyndns.org to make the system accessible at a fixed known name.

After that you should be able to access the web pages of the garage door opener from the web browser in your smartphone. It does not really matter if your phone a 2G (GSM), 3G (UMTS) or other type of technology. The pages provided by the garage door opener are very small and therefore bandwidth is not an issue.

Another option is to not make the system available over the internet and only use the local WiFi network around your house. If you have a smartphone which supports WiFi then this is an option. The problem is however that smartphones do need time to detect a WiFi when arriving from outside. Normally they do not switch the connection type when there is an ongoing data connection. In other words you might find yourself fiddling around with the settings in your phone in front of the garage until you will be able to open it. It's a different story if you do not have a data plan with your mobile service provider. In that case the phone might switch a bit faster to WiFi.  

Some photos

Here are some photos of the user interface on a smartphone. The pages are made such that they zoom automatically to the right size. No manual zooming/resizing is needed.
main page: open/close doors main page: open/close doors
change passwords history log


How fast is it?

Nothing can be faster than a garage door remote control. However those garage door openers have no built-in security.

This smartphone garage door opener application is quite fast too. The page loads much faster than standard web pages because it is small. You will spend most of the time doing some kind of gesture to unlock your phone.

All recent smartphones allow you to save a HTML shortcut on the home screen. Once you have unlocked the phone, you click on the shortcut and with passcode free access enabled you are right on the page to control the doors.

The buttons are nice and big. This is easy to use from a touch screen.

I use it now every day. I stop the car on the driveway to unlock the phone, click, click and the door opens.

This smartphone garage door opener has other advantages too and you can use it in addition to your existing system. You will usually have the phone in your pocket e.g when you are working in the garden. This way you can easily open your garage door and get some tools or whatever you need. You can temporarily give a passcode to a friend while you are on vacation even when you are already out of town. Just tell him the code. Later you can disable access again. If you have the possibility to enter your house via the garage then you can use it when you went for a walk to the letter box and you forgot the door keys. It's convenient and opens new possibilities.

The history function is good too. Did my wife already leave to pick-up the kids or do I have to go there after work? Just check the history page and it gives you an idea.  

References/Download


© Guido Socher, tuxgraphics.org

2011-05-14, generated by tuxgrparser version 2.57